OK, I'm not going to write a new tutorial on split toning. There are plenty of good ones out there and I will save you some time by posting a few here. What we want to do is have an example of a relatively simple technique and how it can change the mood of an image.
Check out the details after the break...
Creative Process:
You have an image, it has potential, but not in the way it looks now. You want to give it something different. Why not try split toning! What split toning does in a nutshell is it takes a black and white image and assigned two different color tones to the lights and the darks of an image and tints them.
For a tutorial on how to do this without Adobe Camera RAW:
For a tutorial on how to do split toning WITH Adobe Camera RAW:
And, yes...I do realize that the Camera RAW instructions are very short....for a good reason....split toning is very easy with Camera RAW or in Lightroom. Adobe has made a special section just for it now in their products. The split toning I will be showing here was before the version of Camera RAW that had split toning and before I had Lightroom.
Location:
Some non-descript cemetery in Canal Winchester, OH
Gear:
Nikon D300
Tamron 28-200mm f/3.8-5.6
EXIF Info:
Shot in Aperture Priority at 1/250th - f/11 - ISO 200 @ 52 mm - matrix metering
Shot in RAW - converted to JPG in Camera RAW - split toned in Photoshop 7
Lighting Setup:
The sunlight of the day.
Shot as it came from the camera.

Pretty normal looking shot....but I had some ideas of doing a composite shot and I wanted to test out some things. I wanted this shot to be dark and sinister, so I thought split toning this with some darker, muddy colors would set the mood.
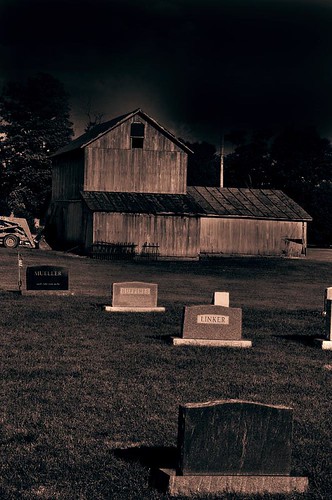
I love me some George Romero "Night of the Living Dead", and that is what I was going for here. I used a dark brownish/red for the dark tones and a lighter yellowish for the light tones. I also wanted to get the clouds subdued so, I dodged the sky which helped give an overall "nighttime" feel to the image.
Don't be afraid to experiment a little with your post processing techniques. It never hurts to have some techniques in your back pocket.
No comments:
Post a Comment
Note: Only a member of this blog may post a comment.